How to Make a Unicorn Cake: A Beginner's Guide to Cake Decorating
Have you ever dreamed of creating a magical, whimsical unicorn cake that would be the talk of the party? Well, dream no more! In this comprehensive guide, we'll walk you through the step-by-step process of making a stunning unicorn cake, even if you're a complete beginner in the world of cake decorating.
Unicorn cakes have become a popular trend in recent years, and for good reason. They're not only visually stunning, but they also capture the imagination of both children and adults alike. Whether you're planning a birthday celebration, a baby shower, or just want to treat yourself, a unicorn cake is sure to bring a touch of enchantment to any occasion.
In this blog post, we'll cover everything you need to know, from baking the perfect cake to creating the magical unicorn design. So, grab your apron, your piping bags, and let's dive into the world of unicorn cake-making!
Gathering Your Supplies
Before we start, let's make sure you have all the necessary supplies on hand. Here's what you'll need:
- A baked cake (your choice of flavor)
- Buttercream frosting (enough to cover the cake)
- Food coloring (in various shades of pink, purple, and blue)
- Edible glitter or luster dust (optional)
- Piping bags and various piping tips
- Fondant (for the unicorn horn and ears)
- Toothpicks or skewers (for the unicorn horn)
- Cake board or platter
Once you have all your supplies ready, it's time to start the fun part – decorating your unicorn cake!
Baking the Perfect Cake
The foundation of your unicorn cake is, of course, the cake itself. While you can use any flavor you prefer, a classic vanilla or white cake works particularly well as the base for this whimsical creation.
When baking your cake, be sure to follow the recipe instructions carefully and use high-quality ingredients. This will ensure that your cake has a tender, moist crumb that will hold up well to the decorating process.
If you want to add a bit of extra flair, you can also consider tinting the cake batter with a few drops of food coloring. A soft pastel shade of pink, purple, or blue can add to the overall unicorn theme.
Frosting and Smoothing the Cake
Once your cake has cooled completely, it's time to start the decorating process. Begin by applying a thin layer of buttercream frosting all over the cake. This is known as the "crumb coat," and it will help to create a smooth surface for the final layer of frosting.
Smooth the crumb coat with a spatula or a cake scraper, ensuring that the surface is as even as possible. This step is crucial, as it will make the final decorations much easier to apply.
After the crumb coat has set, apply a second, thicker layer of buttercream frosting. This time, use a cake turntable (if you have one) to help you achieve a perfectly smooth and even finish. Gently smooth the frosting with a cake scraper, working from the bottom to the top of the cake.
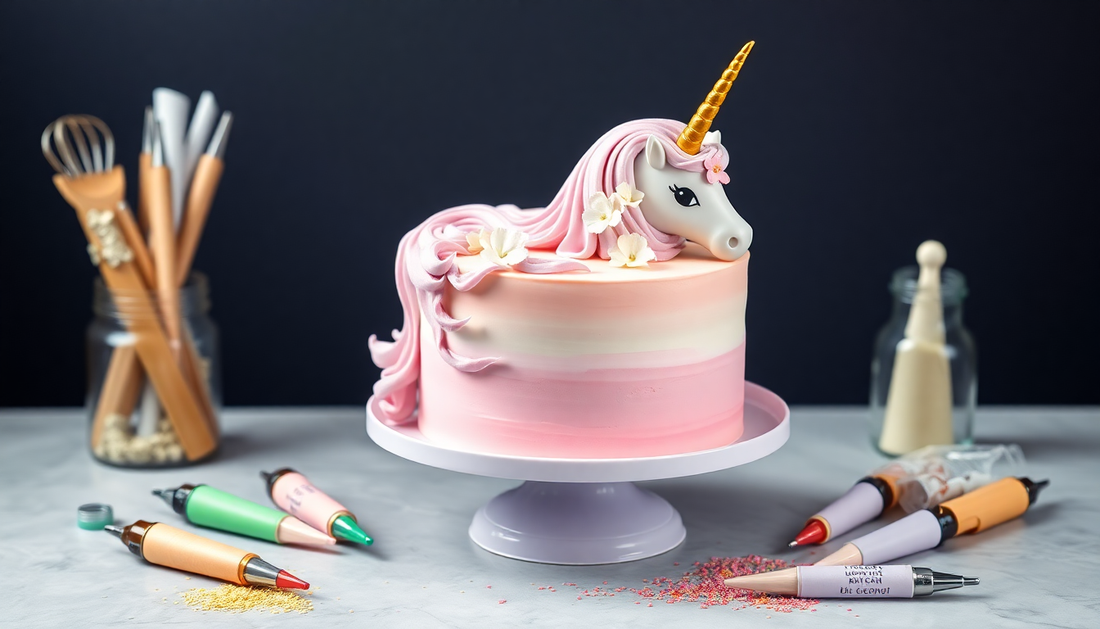
Creating the Unicorn Horn and Ears
Now, it's time to bring the unicorn to life! Start by making the unicorn horn and ears out of fondant.
For the horn, take a small piece of fondant and roll it into a long, tapered cone shape. Use a toothpick or skewer to create a spiral pattern on the horn, giving it a whimsical, magical appearance.
Next, create the unicorn ears. Take two small pieces of fondant and shape them into pointed, triangular ears. You can use a small knife or a fondant tool to add texture and definition to the ears.
Once you've created the horn and ears, carefully attach them to the top of the cake, using a small amount of buttercream frosting to help them adhere.
Decorating with Buttercream
Now, it's time to add the colorful buttercream details that will truly bring your unicorn cake to life. Start by dividing your buttercream into several bowls and tinting each one with a different shade of food coloring.
Using a piping bag fitted with a variety of tips, begin piping swirls, rosettes, and other decorative elements all over the cake. You can create a gradient effect by starting with a darker shade at the bottom and gradually transitioning to lighter shades towards the top.
Don't be afraid to get creative with your piping techniques! Try using different tip shapes and sizes to create a variety of textures and patterns. You can also experiment with techniques like "drip painting" to add a touch of whimsy to your design.
Adding the Final Touches
To complete your unicorn cake, consider adding a few extra touches to really make it shine. Sprinkle edible glitter or luster dust over the entire cake, giving it a magical, shimmering effect.
You can also use small candies, sprinkles, or other edible decorations to add even more personality to your creation. Consider placing a few colorful macarons or meringues around the base of the cake for a playful, whimsical touch.
Remember, the key to a successful unicorn cake is to have fun and let your creativity shine. Don't be afraid to experiment and try new techniques – the more unique and personalized your cake, the better!
Creating a stunning unicorn cake may seem like a daunting task, but with the right tools, techniques, and a little bit of practice, it's a project that even a beginner can tackle. By following the steps outlined in this guide, you'll be well on your way to crafting a magical, one-of-a-kind cake that will delight and impress your guests.
So, what are you waiting for? Grab your piping bags, your food coloring, and let's get started on your very own unicorn cake adventure!
